Introduction
BTRFS (B-tree File System) is a modern filesystem that supports advanced features like snapshots, subvolumes, and integrated RAID support. In this tutorial, we’ll cover how to create a BTRFS RAID 0 array in Linux and share it with Windows for a shared gamedisk in a dual boot system.
RAID 0, also known as striping, spreads data across multiple disks to improve performance.
Prerequisites
Before you begin, ensure you have:
- A system with both Linux and Windows in dual boot
- WinBTRFS BTRFS driver for Windows, download latest version from the releases page and right-click install the btrfs.inf. After that reboot the system.
- At least two identical storage devices (e.g.,
/dev/sdb,/dev/sdc) that you want to use in the RAID 0 array. - Root or sudo privileges.
Before proceeding
I will be doing the setup of the raid in Linux due to BTRFS not being native to Windows and having better support on Linux, it should be possible to do this from Windows
Step 1: Install BTRFS Tools
First, you need to install the BTRFS tools package. This package includes all the necessary utilities to create and manage BTRFS filesystems.
sudo apt-get update
sudo apt-get install btrfs-progs
For other distributions, use the appropriate package manager, such as yum for CentOS or dnf for Fedora.
Step 2: Create the BTRFS Filesystem
Now, create the BTRFS filesystem on the desired devices. In this example, we’ll use /dev/sdb1 and /dev/sdc1.
Partitioned vs Partitionless setup
If you noticea that i’m using partitions(/dev/sdb1) and not the whole device(/dev/sdb), It’s because I partitioned the disks with GPT, you can create a new blank “Linux Filesystem” partition and use mkfs.btrfs to format those partitions as described below, there are discussions on the positives and negatives of both 1, 2
Warning
This will erase the data on disks, if there is another filesystem mkfs will ask to overwrite it.
sudo mkfs.btrfs -d raid0 /dev/sdb1 /dev/sdc1-d raid0specifies that the data should be striped across the devices./dev/sdb1 /dev/sdc1are the partitions that will form the RAID 0 array.
Step 3: Mount the BTRFS Filesystem
Once the filesystem is created, you need to mount it to access it.
Create a mount point:
sudo mkdir /mnt/btrfs-raid0Scan the devices:
sudo btrfs device scanMount the BTRFS RAID 0 filesystem:
sudo mount /dev/sdb1 /mnt/btrfs-raid0Even though BTRFS is a multi-device filesystem, you only need to specify one device when mounting.
Step 4: Verify the RAID 0 Setup
To verify that the BTRFS filesystem is correctly configured as RAID 0, you can use the following command:
sudo btrfs filesystem df /mnt/btrfs-raid0This will display detailed information about the data distribution across the devices.
Step 5: Automate Mounting at Boot
To ensure your BTRFS RAID 0 array is automatically mounted at boot, add it to /etc/fstab.
Get the UUID of the BTRFS filesystem:
sudo btrfs device scanEdit
/etc/fstab:sudo nano /etc/fstabAdd the following line:
UUID=<your-uuid> /mnt/btrfs-raid0 btrfs defaults 0 0Replace
<your-uuid>with the UUID retrieved from thebtrfs device scancommand.Test the configuration:
sudo mount -aThis command will attempt to mount all filesystems listed in
/etc/fstab. If there are no errors, the configuration is correct.Mounting without rebooting
Depending on your OS you might need to reload the systemctl daemon
Reboot to Windows
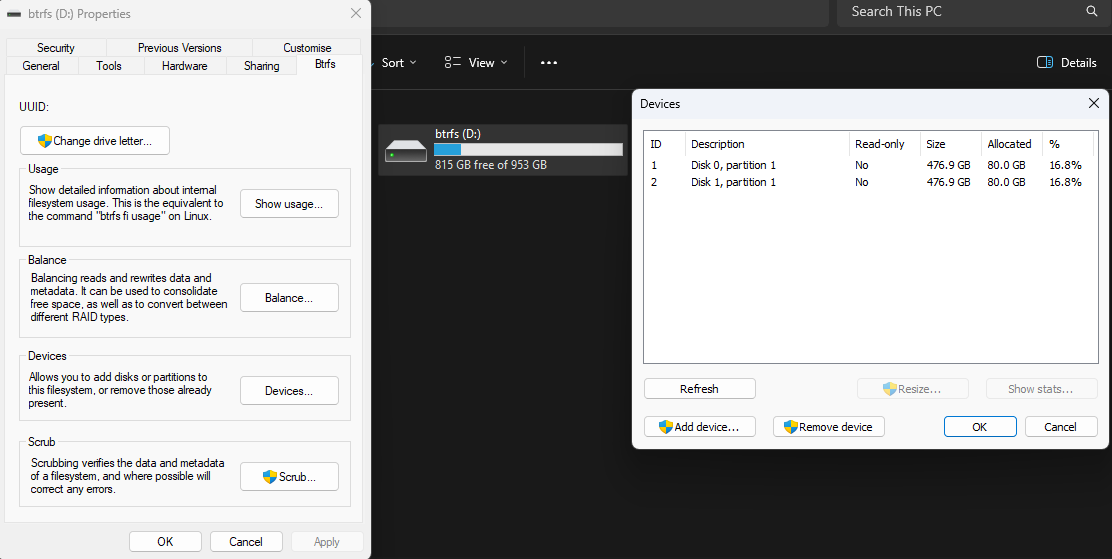
Now on Windows if you have the driver installed the disks should automatically mount, unless you deactivated automounting
Conclusion
You have successfully created a BTRFS RAID 0 array on your Linux system that can be used in Windows. However this is not what I would consider a good solution for storing important data, there is no redundancy and altough the btrfs driver for Windows has come a long way it’s still being developed therefore it makes a great solution for a gamedisk or storing data that you find yourself downloading repeatedly but that in the case of failure you can always download again
Now you can enjoy the performance benefits of your BTRFS RAID 0 setup (These might vary). If you need redundancy, consider using RAID 1 or RAID 10 instead.